The Horns Offense Explained: How to Run the Horns Series and Create Scoring Opportunities at Every Level

Most coaches spend months hunting for an offensive system that's both simple enough to teach and complex enough to keep defenses guessing. The horns series is one of those rare answers. Two ball screens. Two corner threats. One ball handler who reads the defense and makes decisions. That's really all it is on the surface — but underneath that clean structure is a layered system of reads, counters, and variations that can generate quality shots against almost any defensive scheme you'll face.
Whether you're coaching a youth program just getting comfortable with ball screen offense or a high school team that needs a reliable go-to set, the horns formation gives you a starting point that scales beautifully. Let's break it down piece by piece.
Understanding the Basic Horns Formation
Before you can run any of the variations, you need to nail the setup. The standard horns formation looks like this:
- Your ball handler starts at the top of the key with the ball
- Two big men (or screeners) are positioned at each elbow — roughly at the free-throw line extended, near the three-point line
- Two perimeter players are stationed in the dead corners, one on each side

That's your "horns" — the two screeners spread wide at the elbows form the shape visually. It's a clean, symmetric look that doesn't tip the defense off about which direction you're going. And that ambiguity? That's the whole point.
The ball handler initiates everything. He chooses which screener to use — left or right — and that decision sets the entire sequence in motion. Once he picks a side and comes off the ball screen, a few things happen simultaneously:
- The screener he used rolls hard to the rim — this is the roll man
- The opposite big shakes behind toward the top of the key — this is the shake man
- The two corner players stay wide and occupy their defenders
Simple structure. But here's where it gets interesting — what happens next isn't predetermined. It's a read.
The Two-Read System: Primary and Secondary
This is the most important thing to teach your ball handler. Everything else in the horns series flows from this. The moment he comes off the ball screen, he has two reads to make in sequence. Get this wrong and you're just running a poorly timed play. Get it right and you're making the defense choose between two bad options on every possession.
The Primary Read: The Screener's Defender
As the ball handler comes off the screen, his first job is to evaluate the screener's defender — what's that guy doing? There are basically two scenarios:
Scenario 1: The screener's defender sinks (drops back into the paint). If he's backing off and your own defender either trails you or goes over the top of the screen, you have open space. You can pull up for a mid-range jumper at the elbow, or if your defender goes completely over the screen and gives you room, you can catch and shoot the three right off the action. Don't skip past these shots. Mid-range opportunities off ball screens are undervalued, and a confident pull-up from the elbow is exactly the kind of shot a defense that's hedging will eventually give you all night.
Scenario 2: The screener's defender hedges. This is more common at higher levels. The hedge means the screener's defender steps up aggressively to slow the ball handler down at the point of the screen — essentially buying time for the on-ball defender to recover. It looks like it's bad news. It isn't. A hard hedge is actually an advantage for your offense, because that defender just left his man.
That's when the ball handler moves to his secondary read.
The Secondary Read: The Back Two Defenders
Once the ball handler recognizes a hedge, he immediately gets his eyes to the two back defenders — the guys responsible for the corner players and the roll man. The key question: who is covering the paint?
This is where the "tag man" concept comes in. When the hedge happens, one of those back defenders — the tag man — will often drop down to take away the roll man cutting to the rim. That's smart team defense. But the moment he does that, he's abandoned the shake man who's floating behind the screen action at the top of the key.
So the ball handler's job is simple: find the tag man, see where he goes, and make the opposite decision. If the tag man drops to help on the roll, kick it back to the shake man for a three. If the tag man holds and nobody covers the roll, feed the roll man at the rim.
Here's what that looks like in live action: the ball handler goes right, makes the screener's defender commit to a hedge, the tag man drops toward the paint to cut off the roll, and the ball gets swung back to the shake man, who's now wide open at the top for a three. The defense has to scramble — and they're usually a step too late.
This read-and-react structure is what makes horns so teachable. You're not asking players to memorize a dozen counters from day one. You're teaching a logical decision tree: Primary read first, then secondary read. Once players internalize that sequence, the offense starts to run itself.
It's also worth noting that this kind of read-based ball screen offense pairs naturally with other defensive concepts your staff might be installing. If you're working through a system-heavy approach on both ends of the floor, understanding how Tony Bennett's pack-line defense takes away exactly these kinds of reads can help you anticipate what you'll face and prep your players accordingly.
Horns Twist: The Built-In Counter
Once your team has the base horns read down, you can layer in the first variation — and it's a good one. It's called horns twist, and it changes the ball handler's path without changing the initial read much at all. That's what makes it so effective. The defense has already been conditioned to expect one thing. Horns twist gives them something different.
Here's how it works:
- The ball handler initiates off a ball screen just like in the base action
- The screener rolls to the rim — same as before
- But instead of the opposite big shaking behind, he crosses over and sets a second ball screen on the other side
- The ball handler reverses direction and comes off the second screen going back the other way
You're essentially running back-to-back ball screens in opposite directions. The ball handler zigzags through both actions, and the defense has to completely reset their coverage scheme in real time. That's hard to do. Especially if your players are moving at pace.
The reads off horns twist are the same conceptually — the ball handler is still evaluating the screener's defender and the back two defenders — but now the defense has had to switch directions, communicate twice, and potentially switch matchups or recover through two separate screens. Breakdowns happen. And those breakdowns are where your offense scores.
A few coaching points on horns twist:
- The timing of the second screen matters. The opposite big can't just wander over. He needs to set a firm, legal screen in position before the ball handler arrives. Sloppy timing here leads to offensive fouls or a wasted action.
- The ball handler has to sell the first direction. If he's obviously telegraphing the reversal, the defense adjusts early and the advantage disappears. He needs to attack the first screen like he means it before coming back the other way.
- Your corner players still matter. They can't just stand there watching. They need to hold their defenders in place, because any drift toward the ball gives the defense help options they shouldn't have.
What makes horns twist particularly useful is that it gives your ball handler a built-in escape valve. If the defense is doing a good job taking away the first side — great hedge, good tag, no easy reads — the twist resets the whole picture. You're not stuck. You just go the other way and read again.
Think about this from a defender's perspective: you've just hedged a ball screen, recovered, communicated the roll, tagged the shake man — and now the ball is coming back your direction off another screen. That's exhausting. That's the point. Horns series offenses win partly through shot quality and partly through wear. You're making the defense work on every single possession, and that adds up over the course of a game.
The Roll and Replace: Why Horns Twist Creates Defensive Confusion
Here's the core problem Horns Twist is designed to exploit: defenders are creatures of habit. Run standard Horns enough times and the two back-tag defenders will settle into their roles — they know exactly who takes the roll and who covers the replace. They get comfortable. Horns Twist breaks that comfort completely.
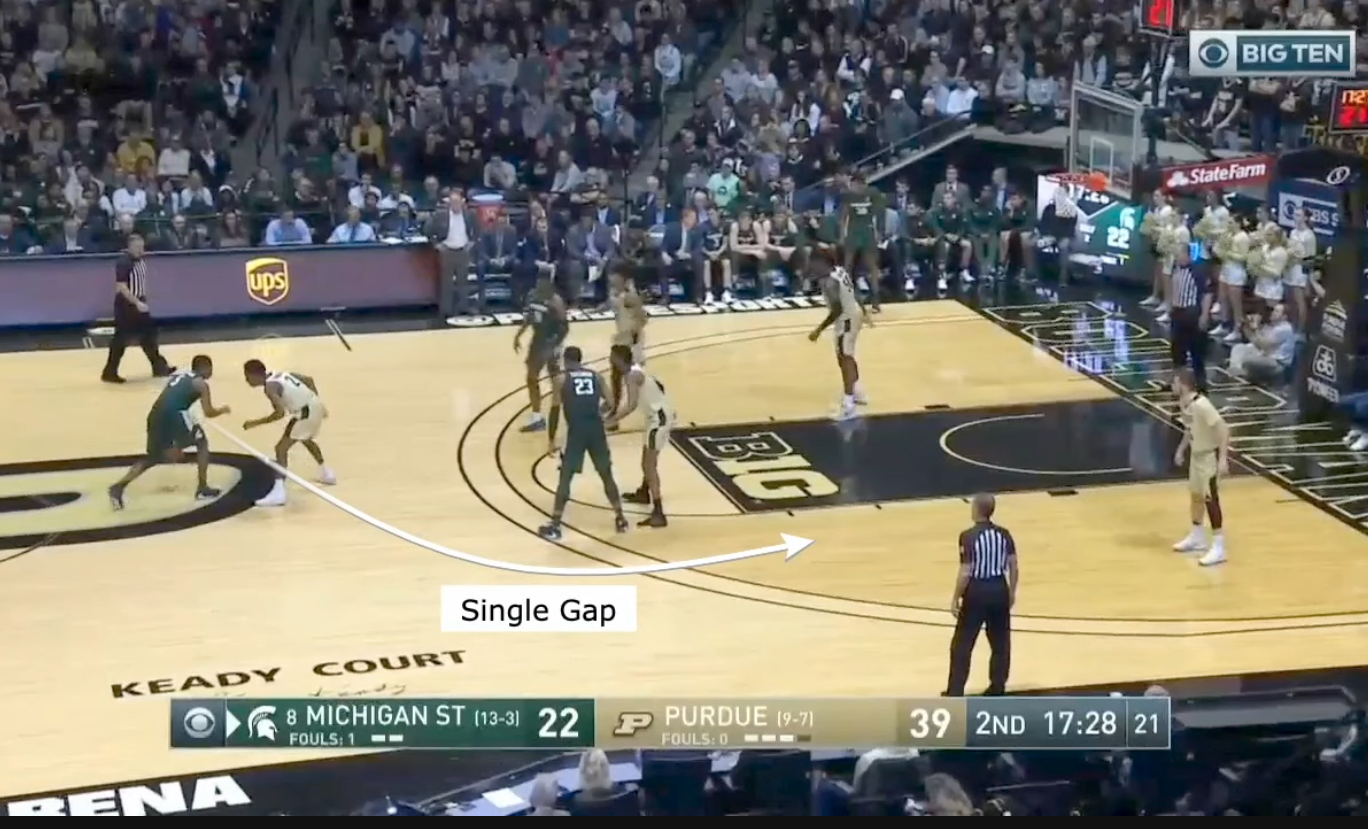
The false motion to one side before reversing creates what's called a double gap — a noticeably wider driving lane than what you'd get off a standard Horns set. That alone is worth something. But the real damage isn't just the gap. It's the confusion behind the play.
In regular Horns, both tag defenders can stand, read the action, and communicate cleanly. Everything is orderly. In Horns Twist, the yo-yo action scrambles their assignments. Who takes the roll? Who covers the replace? If they hesitate even half a second, you've already won.
Watch what happens when the ball handler comes back off the twist — suddenly two defenders are reacting to one offensive player. And while their attention is up at the ball, the replace man is standing wide open on the perimeter for a catch-and-shoot three. That's not accidental. That's the whole point.
Even when a defense communicates the assignment well — when they do call out the roll and the replace correctly — they're still at a numerical disadvantage. They've used two players to account for two actions, and now the backside is exposed. A well-timed skip pass to that backside shooter forces a desperate closeout. Bad closeouts lead to open threes or fouls. Either outcome works.
This kind of sequential pressure — where solving one problem creates another — is what separates good sets from great ones. It's the same principle behind defensive systems built on forcing multiple decisions in rapid succession. Make the defense solve problems faster than they can process, and someone will break down.
Wrinkles and Adjustments Based on Your Personnel
Not every team has five shooters. That's just reality. So what happens when your replace man is a non-shooter? Does the whole concept fall apart? Not at all — you just adjust the wrinkle.
Here are the main variations to have in your pocket:
- The 45 cut: As the ball handler comes off the second screen, if the tag defender gets caught ball-watching, you cut your corner man hard to the basket at a 45-degree angle. A clean read here is a layup or an alley-oop. It's a simple addition, but defenders who over-help on the twist leave that baseline wide open.
- Driving bad closeouts: When the twist forces two defenders to account for the ball handler, the replace man catches with a late, lunging closeout coming at him. Your player doesn't need to be a shooter to take advantage — they just need to attack downhill. You're getting a foul or a layup, not a three.
- Swing into a cleared-side ball screen: This one is underused. The replace man catches, immediately swings it to the wing, and the ball handler sets or accepts a ball screen on a completely cleared side. You've used the initial Horns Twist action to pull defenders around and now you're running a one-on-one ball screen with room to operate. The rest of that possession can flow naturally from there.
The principle across all three variations is the same: read what the defense gives you after the confusion, then attack it. The twist is the setup. Your players' decisions in the aftermath are what finish the possession.
X Horns: A Small Change With a Big Payoff
There's one more wrinkle worth adding to your toolbox — something you can call X Horns. The concept itself doesn't change at all. Same action, same reads, same ball handler decisions. The only difference is that your four and five men cross paths as they move into their screening positions.
Why does that matter? Because it slows defenders down getting to their ball screen coverage assignments. That's it. That's the whole point.
It sounds almost too simple. But think about it — those back-tag defenders are keying on where the four and five set up. When they cross, there's a half-second of hesitation. Who do I follow? Where am I supposed to be? That tiny delay is often all you need. One person guarding two actions. The dominoes start falling from there.
You don't need a dramatic scheme overhaul to get a real advantage. Sometimes it's just crossing two big men as they walk into a set. The defense does the rest of the work for you.
The beauty of building these kinds of layered actions is that each piece reinforces the others. Once defenders have seen a few different looks off the same base action, they can't commit early to any one coverage. That indecision is its own reward — and it's exactly why offensive systems with multiple wrinkles off a single set are so difficult to prepare for in a scouting session.
Horns Flare: Creating Spacing Problems the Defense Can't Solve
Once you've got the basic horns concepts down, the horns flare variation is where things get really interesting — and really difficult to defend. Instead of placing two bigs at the elbows, you swap one out for a guard at the top. That small positional change creates a completely different set of problems for the defense.
Here's how it works step by step:
- The guard at the top acts as your first screener — the ball handler uses him coming off the initial action.
- A flare screen is set for that guard — pulling his defender away from the paint and stretching the defense toward the perimeter.
- The five-man initiates a ball screen — now you have a roller and a perimeter threat on the weak side simultaneously.
Why does this hurt defenses so badly? Because the tag man — the helper responsible for deterring the roll — is stuck. He's been pulled toward the flare action. If he comes to help on the roll, the ball goes to the shake man on the backside. If he stays, the roller goes untouched downhill. One defender literally cannot cover both. That's not a coverage question anymore. That's just math.
There's also a more complex variation worth adding to your playbook. Run the horns flare into a ball screen, then have the screener flip and set a step-up screen on the opposite side. The ball handler comes off with a shake behind him and gets a clean downhill lane. It's a two-action sequence that looks like one continuous flow — exactly the kind of thing that freezes defenses mid-rotation.
The flare itself is doing something subtle but powerful: it's clearing out the left side of the court, removing help before the ball screen even happens. The ball handler isn't fighting through traffic. He's attacking space that the defense vacated for you.
The Princeton Elbow Option: When You Don't Want to Go Straight Ball Screen
Not every possession needs to be a pick-and-roll. If you want to keep the defense off balance — and you should — the Princeton elbow concept out of horns gives you a completely different look without changing your initial formation.
The concept is simple: instead of triggering a ball screen, you enter the ball to the elbow or pinch post area. From there, your offense branches in multiple directions.
- Wide pin down on the opposite side — this clears a shooter into space for a curl or flare opportunity. If they're locked in on the post entry, that shooter can get a clean catch-and-shoot or a pull-up off the curl.
- Zoom action — set a down screen, and then the cutter comes off a dribble handoff from the five. This has become one of the most popular concepts in the game right now, and for good reason. The down screen forces the defender to fight through traffic, and the DHO at the top puts the ball handler in motion with momentum already built in.
The beauty of running zoom out of a horns look is that you're disguising it entirely. The defense sees horns. They're preparing for a ball screen. Instead, you throw it to the pinch post and immediately trigger a completely different action. By the time they recognize it, the cutter is already coming off the handoff with a head of steam.
This is why horns as a series — not just a set — is so valuable. Whether you're studying how elite coaches build defensive structure or trying to build an offense your players can grow into, the best systems give you multiple answers from the same look. Horns does exactly that. Ball screens, flare actions, step-up counters, pinch post entries, zoom — all of it, out of one formation.
If you're looking to add a series that doesn't telegraph your intentions the moment your team sets up, horns is one of the best options available at any level. The defense can't key on what they can't predict. And when you've got this many tools branching from a single set, you're not just running plays — you're building a system.